

Cardiac Surface Anatomy
How to use this resource, and learning outcomes:
1. Why cardiac surface anatomy matters at the bedside
2. Position and orientation of the heart within the thorax
3. The pericardium
4. Surfaces of the heart
5. Borders, base and apex
6. Surface landmarks on the chest wall
7. Linking surface anatomy to the chest radiograph
8. Clinical implications for the acute care nurse
Abbreviations
9. Self-test
Further reading and local governance
How to use this resource
Work through sections 2 to 5 to build the anatomy, then use sections 6 to 8 to link that anatomy to what you actually do at the bedside: where you place your stethoscope, your electrodes, your defibrillation pads and your hands, where you level a transducer, and what you are looking at on the chest radiograph.
Learning outcomes
By the end of this session you will be able to:
– Describe the position and orientation of the heart within the mediastinum.
– Describe the layers of the pericardium and explain why the pericardium behaves as it does in cardiac tamponade.
– Name the surfaces and borders of the heart and state which chamber forms each.
– Locate the apex beat, and list the reasons it may be displaced or impalpable in a critically ill patient.
– Use chest wall landmarks to place a stethoscope, ECG electrodes, defibrillation pads and your hands for chest compressions.
– Explain the anatomical basis of transducer levelling to the phlebostatic axis and the measurement error caused by getting it wrong.
– Identify which structure forms each border of the cardiac silhouette on a chest radiograph, and state where a central venous catheter tip should sit.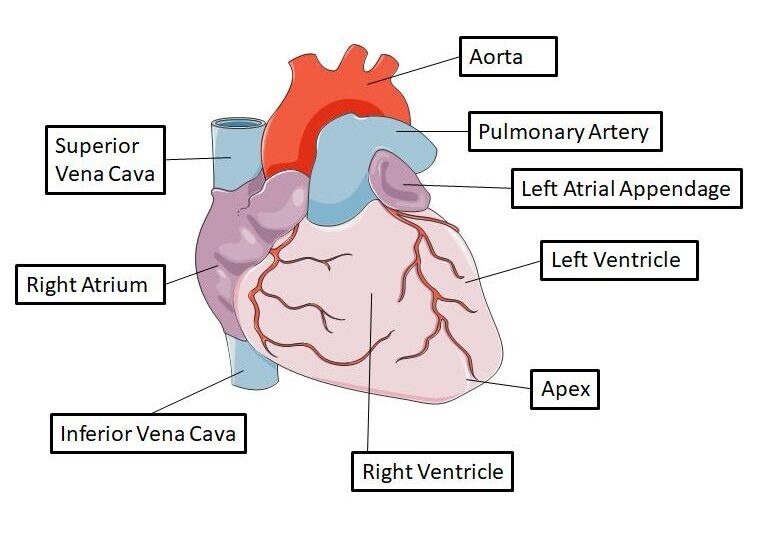
Anterior View of the Heart with Major Structures
Image provided by Servier Medical Art (https://smart.servier.com/), licensed under CC BY 4.0 (https://creativecommons.org/licenses/by/4.0/)
1. Why cardiac surface anatomy matters at the bedside
Surface anatomy is the bridge between the heart as it is drawn in a textbook and the patient in front of you. Almost every cardiovascular skill you will be assessed on, at root, a surface anatomy skill.
You cannot see the heart, so you work from the chest wall. Where you place a stethoscope, an electrode, a defibrillation pad or the heel of your hand determines whether you hear the murmur, record the correct ECG, deliver current through the ventricles or compress the heart rather than the liver.
Monitoring numbers depend on anatomical reference points. A central venous pressure or arterial pressure is only meaningful relative to the level of the right atrium. If the transducer is at the wrong height, the number is wrong — and the treatment decision that follows it may be wrong too.
Deterioration often announces itself anatomically. A trachea deviating, an apex beat that has moved, a heart sound that has become muffled, a widening cardiac silhouette on a Chest Xray — these are anatomical observations that carry immediate clinical meaning.
2. Position and orientation of the heart within the thorax
The heart is a muscular organ roughly the size of the owner’s clenched fist. It sits obliquely in the middle mediastinum, between the lungs, posterior to the body of the sternum and the costal cartilages, and resting on the central tendon of the diaphragm.
It lies approximately at the level of the fifth to eighth thoracic vertebrae.
About two-thirds of its mass lies to the left of the midline.
Its long axis runs from the upper right (the base) downwards, forwards and to the left (the apex).
The apex reaches the left fifth intercostal space in the midclavicular line — the point at which the apex beat is normally palpated.
The whole organ is enclosed within the pericardium, and its external surfaces correspond closely to the chambers that lie behind them.
Practice point — how to count intercostal spaces reliably:
Find the sternal angle (the angle of Louis) — the palpable ridge where the manubrium meets the body of the sternum. This marks the second costal cartilage. The space immediately below it is the second intercostal space. Count downwards from there.
Counting from the clavicle down is unreliable, particularly in obese, oedematous or post-surgical patients. In a patient with a sternotomy wound, count laterally from the sternal angle rather than palpating over the wound.
The sternal angle is worth memorising for another reason: it also marks the level of the carina, the start and end of the aortic arch, and the reference point for jugular venous pressure measurement.
3. The pericardium
The pericardium is a double-walled sac. It has two components:
Fibrous pericardium — the tough outer layer. It is fused inferiorly to the central tendon of the diaphragm and blends superiorly with the adventitia of the great vessels. It is strong and, in the short term, essentially non-distensible.
Serous pericardium — a smooth inner layer with two continuous parts: the parietal layer, which lines the fibrous pericardium, and the visceral layer (the epicardium), which is adherent to the surface of the heart itself.
Between the parietal and visceral layers is the pericardial cavity, which normally contains only a small volume of serous fluid — in the order of 15 to 50 mL — acting as a lubricant so the heart can move freely during the cardiac cycle.
Why this matters — the anatomy explains cardiac tamponade (a life threatening emergency caused by a rapid build up of fluid, blood or air in the sac around the heart which squeezes the heart, stopping it from filling with blood to pump)
Because the fibrous pericardium cannot stretch acutely, the relationship between pericardial volume and pressure is steep. A relatively small, rapidly accumulating collection — for example 100 to 200 mL of blood after cardiac surgery, trauma or a procedural complication — can raise intrapericardial pressure enough to impair ventricular filling and cause tamponade.
By contrast, a slowly accumulating chronic effusion allows the pericardium to remodel and may reach well over a litre with comparatively few haemodynamic consequences.
This is why the size of an effusion on the report matters far less than the rate at which it formed and what the patient looks like. See the Cardiac Tamponade page.
4. Surfaces of the heart
The heart is conventionally described as having four surfaces plus a posteriorly directed base.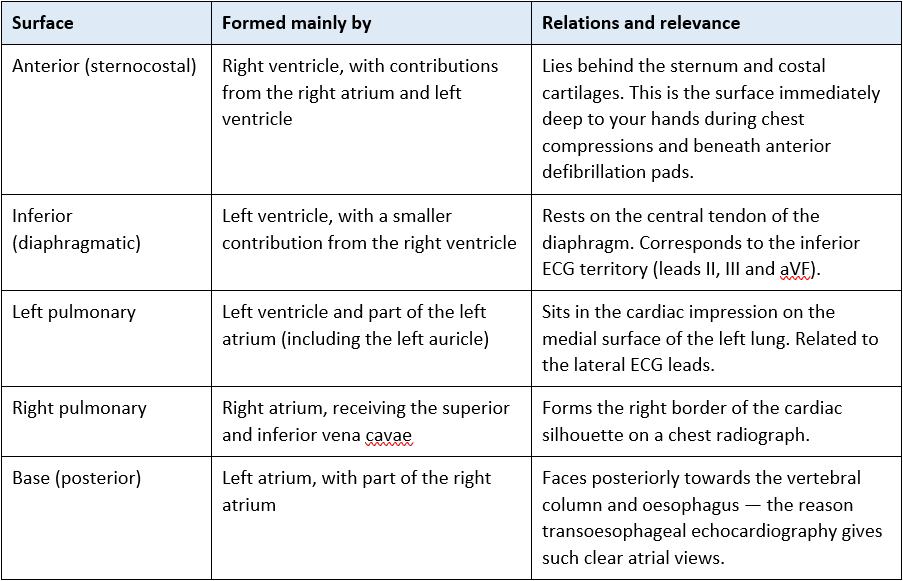 The heart is conventionally described as having four surfaces plus a posteriorly directed base.
“>
The grooves (sulci)
The external grooves mark the internal partitions between chambers, and carry the main coronary vessels.
Atrioventricular (coronary) groove — encircles the heart, separating atria from ventricles. It carries the right coronary artery on the right, the left circumflex artery on the left, and the coronary sinus posteriorly.
Anterior interventricular groove — runs down the anterior surface, marking the boundary between the ventricles. It carries the left anterior descending (anterior interventricular) artery and the great cardiac vein.
Posterior interventricular groove — runs on the inferior/posterior aspect, carrying the posterior descending artery and the middle cardiac vein.
The point on the posterior surface where the atrioventricular and interventricular grooves meet is the crux cordis. See the Coronary Artery Anatomy page for what runs where and why dominance matters.
5. Borders, base and apex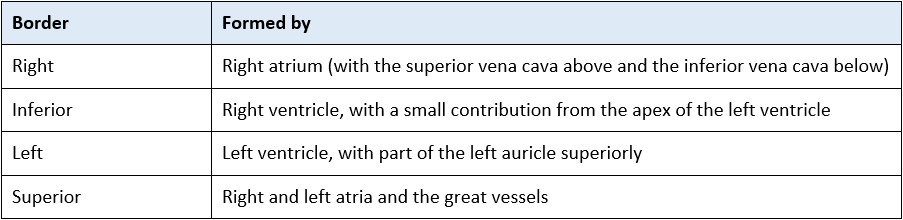
Base
The base faces posteriorly and slightly to the right, towards the vertebral column. It is formed mainly by the left atrium, with a contribution from the right atrium, and is where the great vessels enter and leave.
Apex
The apex is formed by the tip of the left ventricle and is directed forwards, downwards and to the left. It normally lies in the fifth intercostal space in the midclavicular line, and this is where the apex beat — the most inferolateral point at which the cardiac impulse can be palpated — is felt.
The apex beat in critical care
In a critically ill patient the apex beat is frequently impalpable, and this is not in itself abnormal. Common reasons include obesity, oedema, hyperinflation and COPD, positive pressure ventilation, chest wall dressings, a pericardial effusion, and simply the patient’s position in bed.
When it can be felt, displacement is informative:
• Displaced down and out (inferolaterally) — left ventricular dilatation, for example in chronic volume overload or dilated cardiomyopathy.
• Displaced away from the affected side — mediastinal shift caused by a tension pneumothorax or a large pleural effusion. A trachea deviating in the same direction supports this and is a time-critical finding.
• Displaced towards the affected side — volume loss on that side, such as lobar collapse, pneumonectomy or fibrosis.
• Heaving, sustained or thrusting in character — pressure or volume loading of the left ventricle.
Document what you find and, just as importantly, compare it with what was documented on the previous shift.
6. Surface landmarks on the chest wall
This section converts the anatomy above into the landmarks you use every shift. All descriptions assume a supine patient unless stated.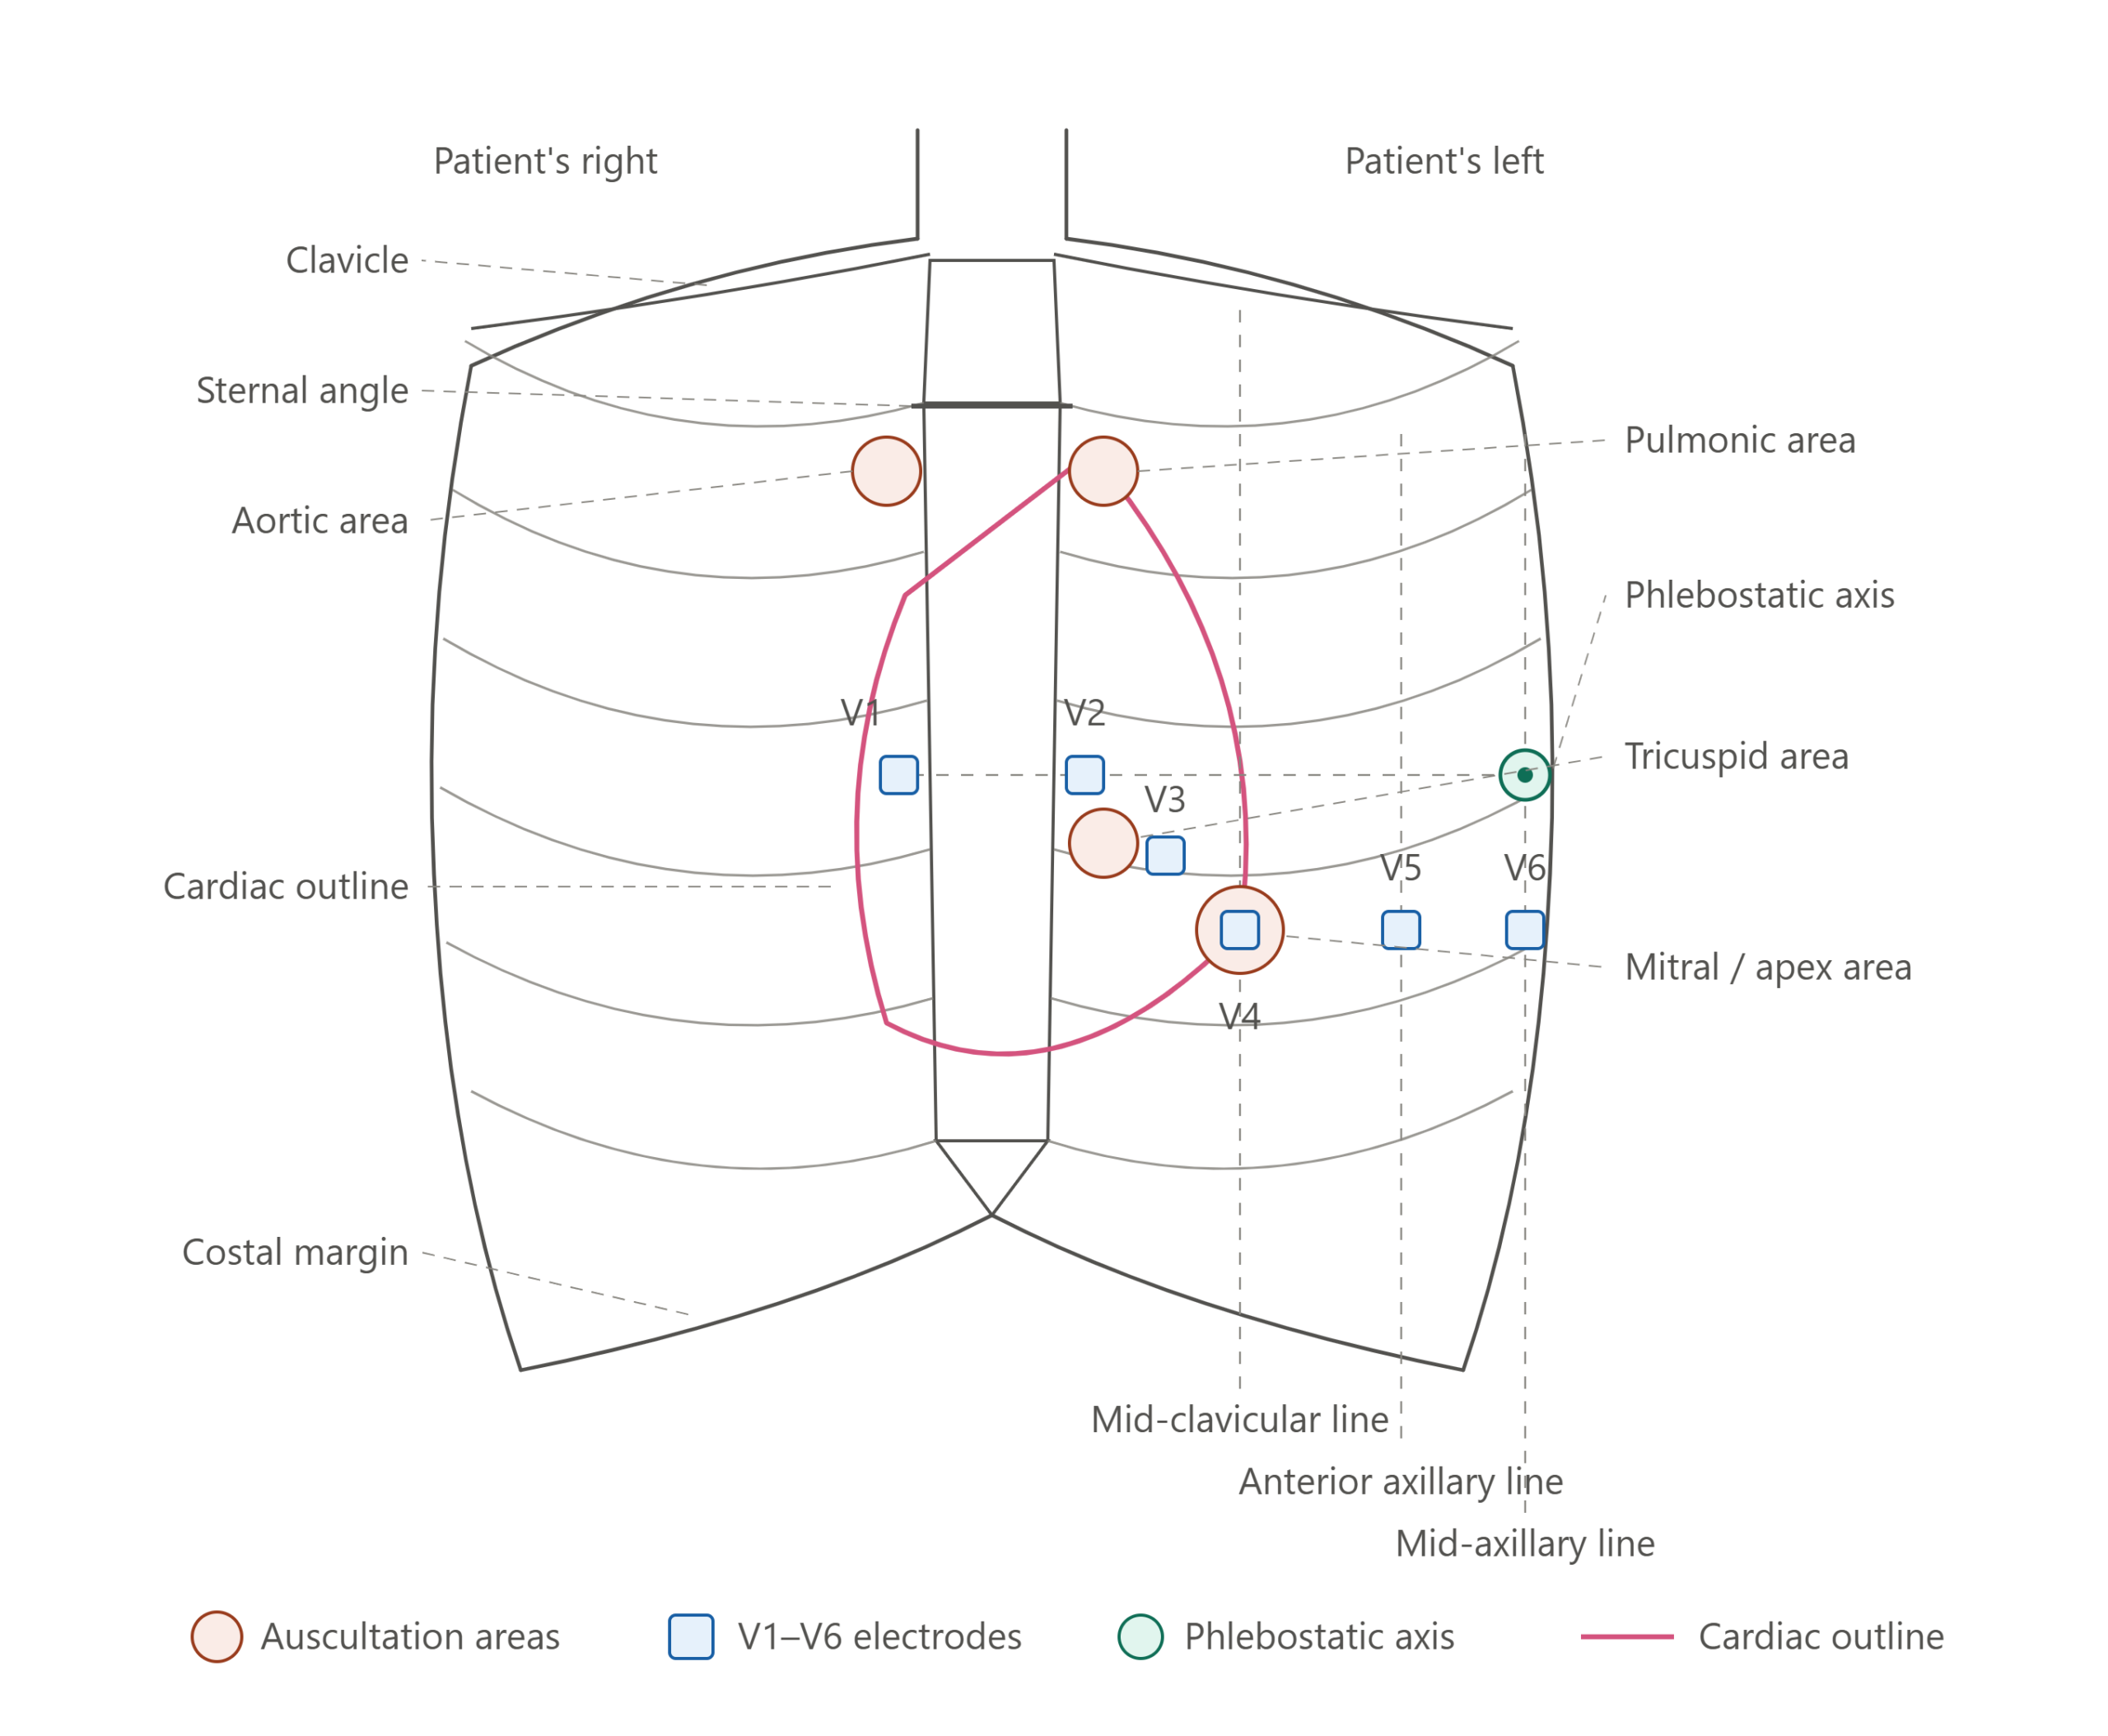
line diagram of the anterior chest wall showing the cardiac outline, the four auscultation areas, V1–V6 electrode positions and the phlebostatic axis.
6.1 Auscultation areas
These are the areas where sound from each valve is best transmitted to the chest wall — they do not sit directly over the anatomical valve.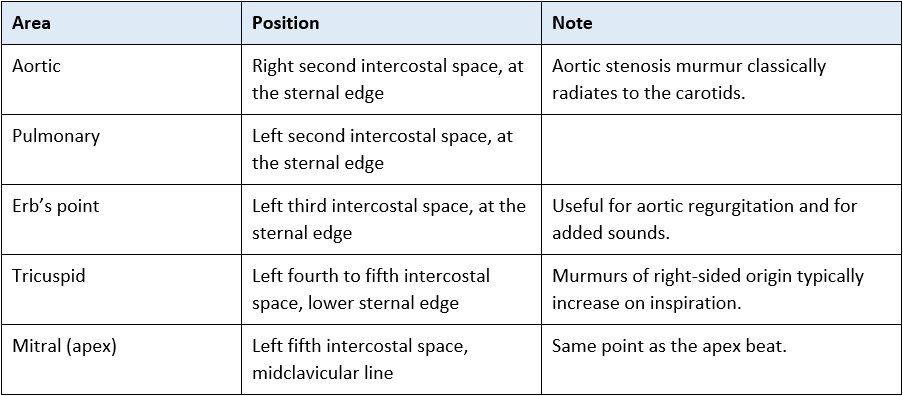
See the Heart Sounds (auscultation) page for technique and for what you are listening for.
6.2 ECG electrode placement
Chest lead misplacement is one of the commonest sources of misleading ECGs in critical care, and V1 and V2 placed too high is the classic error — it can mimic anterior changes or produce a false poor R wave progression.
V1 — fourth intercostal space, right sternal edge.
V2 — fourth intercostal space, left sternal edge.
V4 — fifth intercostal space, midclavicular line.
V3 — midway between V2 and V4.
V5 — anterior axillary line, in the same horizontal plane as V4.
V6 — midaxillary line, in the same horizontal plane as V4.
Mark the positions if serial ECGs are expected, and record any deviation from standard placement on the trace. Comparing a new ECG against a baseline recorded with different electrode positions is a recognised cause of unnecessary escalation — and of missed change. See 12 lead ECG Placement.
6.3 Defibrillation and cardioversion pad placement
Standard (anterolateral): one pad below the right clavicle at the right sternal edge; the other in the left midaxillary line at approximately the level of V6, avoiding breast tissue. The aim is for the current vector to pass through the ventricular mass.
Anteroposterior: one pad over the left precordium and the other below the left scapula. Often preferred for elective cardioversion of atrial fibrillation and where devices or dressings obstruct the standard position.
Devices: place pads at least 8 cm from an implanted pacemaker or ICD generator, or use the anteroposterior position.
Follow the current Resuscitation Council UK guidance and your local policy.
6.4 Chest compressions
Compress the lower half of the sternum. This overlies the right ventricle and the left ventricular outflow tract. Compressing too high wastes force on the manubrium; too low risks the xiphoid process, liver and stomach. Depth 5 to 6 cm at a rate of 100 to 120 per minute, allowing full recoil.
6.5 The phlebostatic axis and transducer levelling
The phlebostatic axis is the external landmark that corresponds to the level of the right atrium: the intersection of the fourth intercostal space with the midaxillary line — that is, halfway between the anterior and posterior chest wall at the level of the fourth intercostal space.
Both arterial and central venous transducers are levelled to this point and zeroed to atmosphere. It is the anatomical reference that makes the number mean something.
Why levelling errors matter
A column of fluid exerts pressure. Roughly 1 cmH₂O is equivalent to 0.74 mmHg, so a transducer sitting 10 cm above the phlebostatic axis will under-read by approximately 7 mmHg — and 10 cm below it will over-read by the same amount.
On a CVP of 8 mmHg that is the difference between a number that prompts fluid and one that does not. On a mean arterial pressure it is enough to trigger or withhold a vasopressor change.
Re-level and re-zero after any change in bed height or patient position, at the start of every shift, and before acting on an unexpected reading. If a value has changed abruptly with no clinical change in the patient, check the transducer before you check the patient’s physiology — then check the patient anyway following an A to E approach.
See Arterial Line Transducer and Invasive Monitoring – Waveforms.
6.6 Jugular venous pressure
The internal jugular vein runs deep to sternocleidomastoid and is assessed by its pulsation rather than seen directly. The patient is positioned at approximately 45 degrees, and the vertical height of the pulsation is measured above the sternal angle, which lies roughly 5 cm above the right atrium in most positions. A raised JVP with clear lung fields and hypotension is a classic combination in right ventricular infarction, tamponade and massive pulmonary embolism.
6.7 Vascular access landmarks
Internal jugular vein — lateral to the carotid artery, within the triangle formed by the two heads of sternocleidomastoid and the clavicle.
Subclavian vein — beneath the clavicle at the junction of its medial and middle thirds.
Femoral vein — medial to the femoral artery in the femoral triangle, below the inguinal ligament.
Landmarks are useful for understanding the anatomy, for positioning the patient and for anticipating complications — but central venous access in UK practice is ultrasound-guided. See Central Line Insertion and Central Line – Hazards and Complications.
6.8 Epicardial pacing wires after cardiac surgery
Temporary epicardial wires are sutured directly to the surface of the heart and brought out through the chest wall below the sternotomy. Atrial wires are attached to the right atrium and ventricular wires to the right ventricle, and by convention they exit on opposite sides of the midline. Always confirm which is which from the operation note and your local policy before connecting anything. See Epicardial Pacing following Cardiac Surgery.
6.9 Pericardiocentesis
Historically described using the subxiphoid (Larrey’s point) landmark — the angle between the xiphoid process and the left costal margin, with the needle directed towards the left shoulder — chosen to avoid the internal mammary artery, the pleura and the coronary vessels.
In current UK practice, pericardiocentesis is echocardiography-guided, with the site and trajectory selected by ultrasound rather than by landmark; an apical or parasternal approach is frequently chosen in preference to the subxiphoid route. Your role is to recognise tamponade early, escalate immediately, prepare the patient and equipment, and monitor throughout. Follow local policy.
7. Linking surface anatomy to the chest radiograph
Reading the cardiac silhouette is a direct application of the borders described in section 5.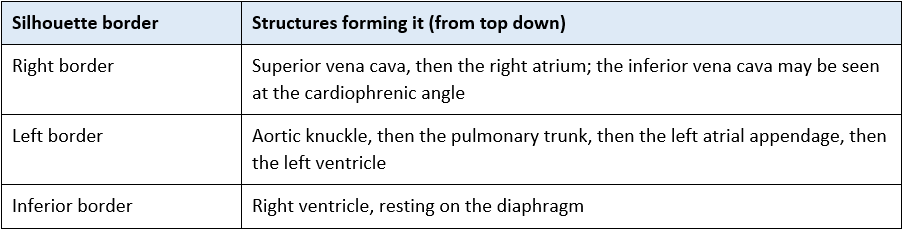
Cardiothoracic ratio
On a correctly taken posteroanterior (PA) film, the maximum transverse cardiac diameter should be less than half the maximum internal thoracic diameter — a cardiothoracic ratio below 0.5.
The portable ICU film is anteroposterior (AP), taken supine at a shorter distance. This magnifies the cardiac silhouette, so an apparently enlarged heart on a portable film is not reliable evidence of cardiomegaly. Compare serial films taken under similar conditions, and treat a genuinely and rapidly enlarging ‘globular’ silhouette — particularly alongside hypotension and muffled heart sounds — as a reason to escalate for urgent echocardiography.
Line and tube positions
Central venous catheter tip — should sit in the lower third of the superior vena cava, at or just above the junction with the right atrium; on the film this is approximately at the level of the carina. Confirm position, and document it, before use, in line with local policy.
Endotracheal tube tip — approximately 2 to 5 cm above the carina, which sits at the level of the sternal angle.
Mediastinal shift — compare the position of the trachea and the cardiac silhouette against the previous film. Shift away from a hyperlucent hemithorax in a deteriorating patient suggests tension pneumothorax — a clinical diagnosis requiring immediate decompression, not a radiological one requiring a film.
8. Clinical implications for the acute care nurse
Every shift
Level and zero arterial and central venous transducers to the phlebostatic axis at the start of the shift, after any change in bed or patient position, and before acting on an unexpected number.
Check ECG electrode positions when you take over, and re-site them properly rather than working around a displaced lead. Document any non-standard placement.
Know where the defibrillator is, that it is checked, and where the pads go on the patient in front of you — including the alternative position if dressings, wires or a device are in the way.
Note whether the apex beat is palpable and where, and compare with previous documentation.
Recognising deterioration
Tamponade: hypotension, raised JVP and muffled heart sounds (Beck’s triad), often with tachycardia and pulsus paradoxus. In the post-cardiac-surgery patient, a sudden fall in chest drain output alongside deteriorating haemodynamics is a red flag — the drains may have clotted. Escalate immediately.
Tension pneumothorax: hypotension, hypoxia, rising airway pressures in the ventilated patient, reduced air entry, and mediastinal shift with a displaced apex beat and deviated trachea. Treat immediately; do not wait for imaging.
Massive pulmonary embolism: hypotension with a raised JVP and clear lungs — anatomically the same picture as right ventricular failure from any cause.
9. Self-test
The section to check your answer against is shown in brackets.
– Where would you expect to palpate the apex beat in a healthy adult, and give four reasons why it might be impalpable in your ventilated patient. (Sections 5 and 6)
– Which chamber forms most of the anterior surface of the heart, and why does that matter during chest compressions? (Sections 4 and 6.4)
– Your patient’s CVP has risen from 6 to 13 mmHg since the bed was lowered for a wash. What is the most likely explanation, and what do you do before escalating? (Section 6.5)
– A colleague places V1 and V2 in the second intercostal space. What effect could this have on the ECG, and what would you do? (Section 6.2)
– Explain, using the anatomy of the pericardium, why 150 mL of blood in the pericardial sac after cardiac surgery can be life-threatening while a 900 mL chronic effusion may not be. (Section 3)
– Which structures form the right and left borders of the cardiac silhouette on a chest radiograph, and why should you be cautious about diagnosing cardiomegaly on a portable ICU film? (Section 7)
– Where should the tip of a central venous catheter sit, and which radiological landmark helps you check it? (Section 7)
– A patient becomes acutely hypotensive with a raised JVP, muffled heart sounds and a sudden reduction in mediastinal drain output on day one after cardiac surgery. What is your working diagnosis and what are your immediate actions? (Sections 3 and 8)
Abbreviations
AP Anteroposterior
AV Atrioventricular
CC3N Critical Care Networks – National Nurse Leads
COPD Chronic obstructive pulmonary disease
CVP Central venous pressure
CXR Chest radiograph
ECG Electrocardiogram
ICD Implantable cardioverter defibrillator
ICS Intercostal space
IVC / SVC Inferior vena cava / superior vena cava
JVP Jugular venous pressure
LAD Left anterior descending artery
MAP Mean arterial pressure
PA Posteroanterior
Chest Radiograph with anatomical labels for reference of overall positioning: 
Related AskAlth pages:
Structure and Function of the Heart
Heart Valves
The Cardiac Cycle
Coronary Artery Anatomy
Cardiac Conduction System
12 Lead ECG Placement
Heart Sounds (Auscultation)
Invasive Monitoring — Waveforms
Cardiac Tamponade
References and further reading:
Critical Care Networks–National Nurse Leads (2015) National Competency Framework for Registered Nurses in Adult Critical Care: Step 1 and Step 2, Version 2. Available at www.cc3n.org.uk
Tortora, G. and Derrickson, B., Principles of Anatomy and Physiology (current edition)
Drake, R., Vogl, A. and Mitchell, A., Gray’s Anatomy for Students (current edition).
Last Updated July 2026, AskAlth Nursing Team, London UK
AskAlth is an independent educational resource created by doctors and NHS critical care nurses. It is not affiliated with CC3N, NICE, or the NHS, though our content is mapped to and referenced against their published frameworks and guidance.